Momofuku pork belly is so good a restaurant empire was built on it. Melting tender and deeply flavoured. And this is how they do it. For real. I asked. At the restaurant.
I’ve seen a bunch of Momofuku pork belly recipes on the net. I’ve looked at the book. And I’m telling you it’s all wrong. All the recipes are the same. Cure it up to 24 hours. Blast it at 450 for an hour.
Drop the temperature to 250F and then cook it to 165F. That’s a recipe for tasty but tough pork belly. Chewy. Not the Momofuku pork belly magic. No way. Not close.
My lesson on Momofuku pork belly – in the kitchen at Momofuku
Don’t write me off here. I was at Momofuku. I asked the waiter how they make the pork belly.
It went like this…
“How do they cook the pork belly?”
“They cure it and roast it.”
“What temperature?”
“I’ll be right back.”
Different guy shows up at the table.
“They cook it at 290F.”
“Thanks. For how long?
“Please come with me sir”
No secrets anymore
Off I went to the kitchen. That’s how I got my lesson. I spoke to the chef. Not David Chang though. That would have blown my mind. But still, good enough.
This is the lesson I got for the Momofuku pork belly. Just as I was told. And I believe it because it’s just how I remember the pork belly.
The cure, I was told, is half salt, half sugar and a bit of pepper. I don’t like things too sweet so here I cut the sugar in half. That’s the only variation I made. I’ve tried it both ways. Both crazy good. I just like it better with less sugar.
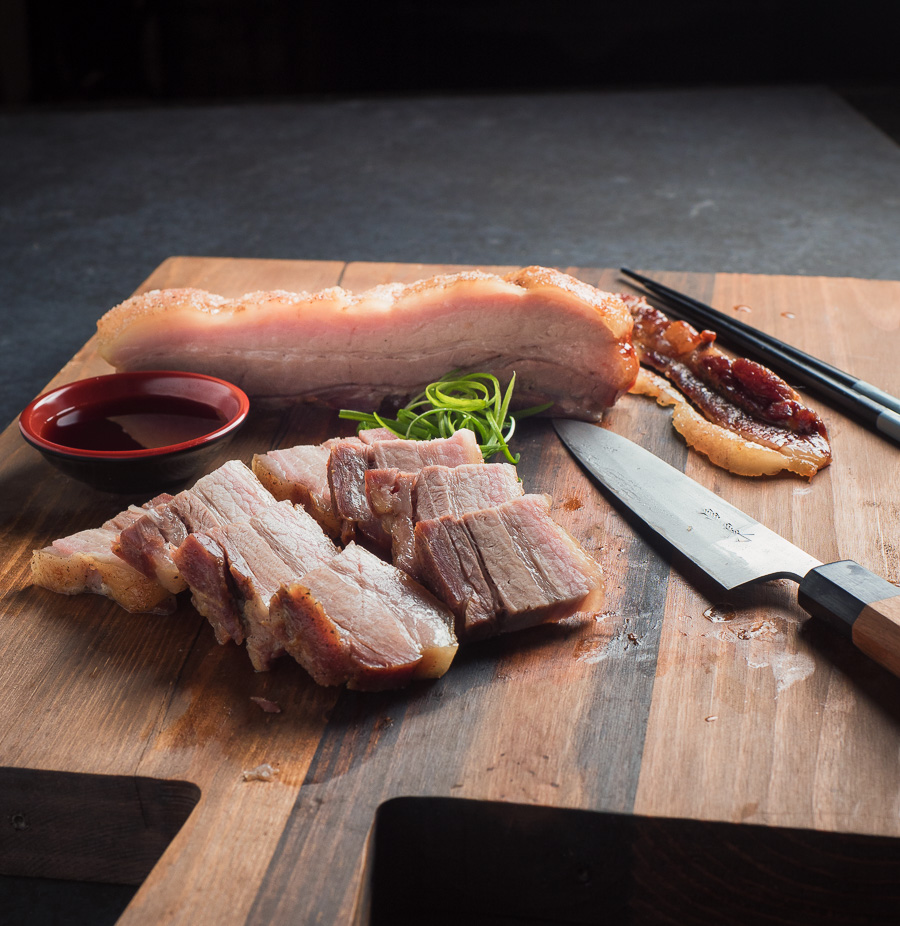
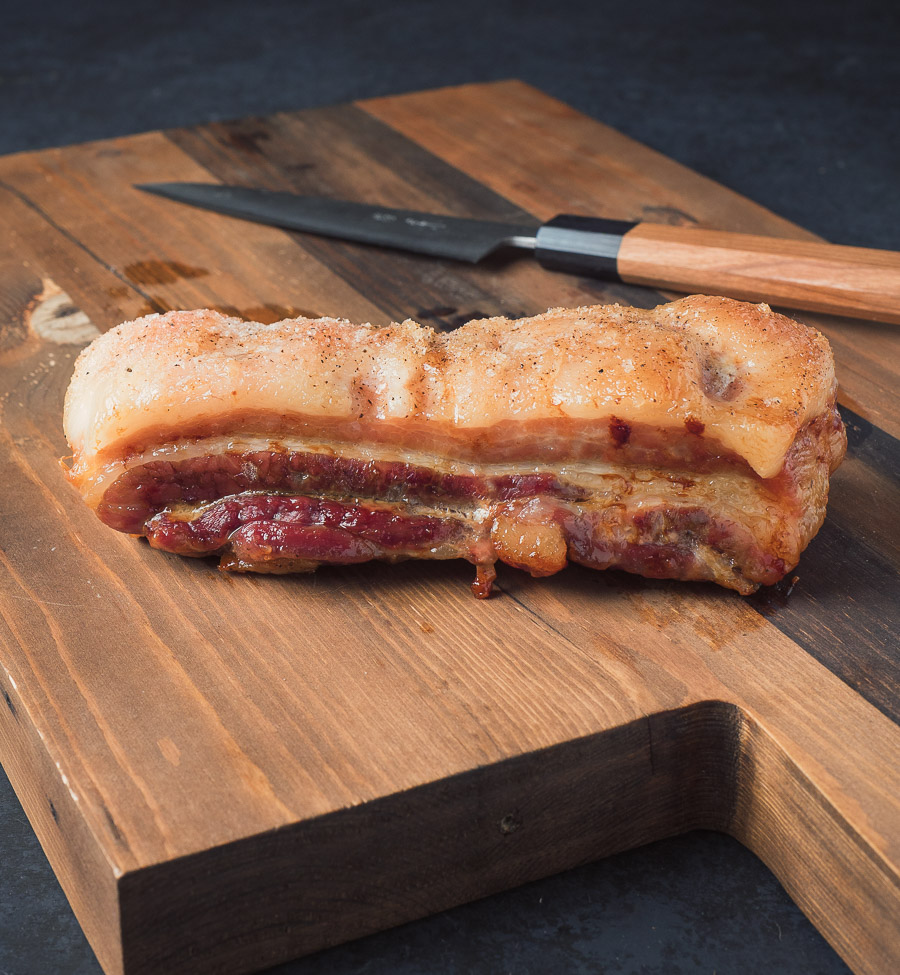
Skin the pork belly. 12 hour cure. Bake at 290F to an internal temperature of 190F. Rest. Done. That’s all there is to it.

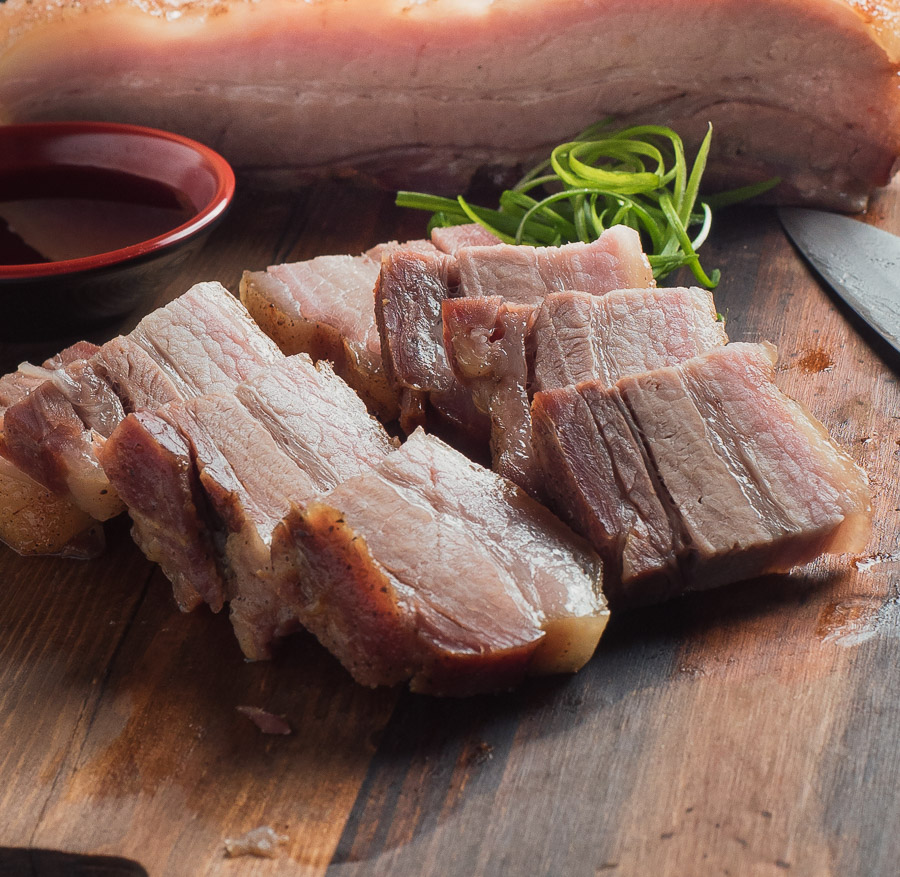
Next time you want the Momofuku pork belly experience, make this. Make pork buns. Put it in your ramen. Or in the best ever pork belly sandwich. Slice it up and serve it with ponzu dipping sauce.
Or just stuff your face when it comes out of the oven. It’s all good. Really, really good.
momofuku pork belly
Ingredients
- 3 lbs meaty pork belly
The cure
- 1/4 cup kosher salt - specifically diamond crystal brand.
- 2 tbsp white sugar
- 1 tsp black pepper
Instructions
- Combine the sugar, salt and black pepper and mix well. You will likely have too much so don't feel like you have to use all of it. You want to coat liberally. Not pack it in the cure mix. Don't use table salt. Diamond crystal kosher salt. If you want to try it with table salt please roll way back on the amount of salt you use. It's tested with diamond crystal. It works with diamond crystal.
- Remove the skin from the pork belly. You can get your butcher to do this for you. If you want to do it yourself it's not that hard if you have a good knife. Run the blade along the skin, pulling the flap of skin up as you go along. If you screw up don't worry. Just try again. It's not like it has to be perfect. It's a pork belly...
- Pull out a cookie sheet. Put the pork on the cookie sheet and coat the pork belly liberally with the sugar, salt and black pepper mixture.
- Refrigerate the pork belly, uncovered for 12 hours. Try not to go less than 10 hours. Don't go much over 14. A long cure is not what you are looking for here.
- Pre-heat your oven to 290F.
- Remove the pork from the fridge, brush any remaining cure from the surface (or give it a quick rinse) and place it in a baking pan large enough to hold it comfortably. If you don't have one, use your cookie sheet. Cover with foil and place in the oven.
- Cook to an internal temperature of 190F. I can't tell you how long this will take because I don't know how thick your pork belly is. Maybe 4 hours. But start checking after two hours. This is like BBQ. It's done when it's done.
- Remove the pork from the oven and let rest 10-15 minutes. Slice and serve.
- To re-heat, steam slices if you want it meltingly tender. Pan-fry slices if you want a bit of crust. All good...
I’ve made this recipe before, but I was being stupid and accidentally got pork spare ribs instead of pork belly. Could I make the recipe the same way?
I’ve never tried that but it’s a low and slow recipe. Ribs love low and slow. Alternately, I just posted a pork rib ragu that I am absolutely crazy about if that’s something of interest to you…
Currently making this for the first time.
I’m curious if I can cure the belly, and then wait a day or two before cooking?
I’m worried about timing everything and I have family coming in to enjoy the meal too.
The idea being that you rinse the pork? I actually have no idea how that will work out. Sorry. You can make the pork belly and gently warm it for service. That does work.
i shiftclicked on the recipie and accidently made 3 1/2 stacks of pork bellies
I can come help you eat it:-)
This worked great for me. I had a long skinny strip of belly rather than a slab but cut it in three pieces and cured and cooked as directed—two hours at 290 in my toaster oven. Sliced and tossed in a stir fry of green beans with ginger and garlic and a Gochujang-soy-mirin sauce.
Delighted you enjoyed it!
I bought a pork belly I thought was skin on at Costco but was actually skinless.. was so upset and started looking for recipes. Came upon this one and just made it. WOW!!! This stuff is awesome. Whole family loves it. Going to try and make the bao buns and do those with this next. Thanks so much!!!
P.S. Corded or wireless meat probe helps a ton with making sure temp is correct.
I’d love to take credit but this is taken directly from what the chef at Momofuku LV shared with me:-)
Making this soon…Virtually all of your recipes are to die for, so we are very excited to try this one. Along the lines of Vietnamese pork recipes, have you ever made Cao Lau? We brought packages of the ‘authentic’ noodles back from Hoi An, but have been afraid to waste them on poorly conceived recipes. Would jump for joy if you have your own iteration!
I don’t have one I’m afraid. I’m not sure I’d dare put your noodles to risk in any case. But I will start tinkering. I do so love Vietnamese noodles!
Just made this today and enjoyed it with a hoison bbq sauce; it was easy and delicious, just like every other recipe I’ve made from here. Thanks!
Delighted to hear that. You are very welcome!
This turned out great. The second time I made it I added a tablespoon each of msg and garlic powder. It’s magical.
I think I figured out why this cooked fast for another person in the comments. I bet they used Pyrex and not a baking pan made of metal.
Nice detective work! I can’t remember the last time I used a pyrex baking dish so I am clueless on what that would do…
Would you mind sharing what impact longer or shorter curing time will do? You say “this is not what we’re looking for here”. What happens if cured too long or not long enough? Asking for a friend
Ask David Chang? No, not really:-)
Salt travels an inch a day in a dry brine (roughly). A pork belly is about an inch thick. The salt moves in from both sides in the cure. So in 12 hours it moves 1/2 an inch from each side or pretty much through the whole thing. A long dry brine starts to change the texture. A 14 hour upper limit is probably a little conservative but I don’t anyone going long, messing with the texture and being unhappy. So I went with 14 to make sure it works.
I’m looking at Momofuku book, and the variant that is served with consomme, on page 247 says 270 F, uncovered, basting every hour until tender. Again there are differences, like the foil covering, but it sounds closer to what you actually had at the restaurant at the time! It’s interesting to find out what restaurants are actually doing, instead of what the cookbooks say.
There’s nothing better than getting into the kitchen to see what’s actually going on.
Very good! But my piece took less than half the time to cook so let’s just say dinner is ready ahead of time.
To reheat, since I’m pretty much a novice to steaming methods… How/how long would you steam the slices back in a basket steamer? Thanks
Sounds like your oven runs hotter than mine? I check mine with an infrared thermometer rather than rely on the indicated temperature.
As far as steaming goes – not long. You are basically just warming it through. A few minutes…
So glad I came across this recipe while searching for another. I purposely purchase a 6 lb pork belly with skin on, but instead, the butcher gave me skinless pork belly. Very disappointed. I made it, and damn!! It was fantastic…. meat was succulent and juicy. I still have so much left, that I made char siew sauce for this and glazed it in in the oven on broil. Oh, are it with steamed bao with glazed pork belly. 😋😋
Awesome to hear you enjoyed it (and will enjoy the leftovers as well). Maybe it’s time to make ramen?
Going to try this for the first time along with making your Ramen noodle soup recipe. Super excited! One question, and please forgive my ignorance. In this recipe, what is the purpose for the cure? Is it simply for flavor, or is it also to draw out the moisture from the meat/skin a bit? I’ve seen YouTube videos that cure overnight, but every one of them had the skin on, and they were talking about trying to dry out the skin a bit so that they can get it crispy and crackly. If you marinated the meat instead of curing it, any idea how that would affect the end result using this cooking method?
It’s a dry brine. It’s about flavour and mostly about salt. There’s no attempt at drying out the skin as the skin is removed.
I’m not sure you mean by marinate? Do you mean wet brine? I haven’t tried that but generally I’m not a fan of wet brining. It’s messy and I am not a big fan of the resulting texture.
My Family Loved it. I am definitely sharing Guys, Thanks For sharing this Great Recipe. this recipe and this website with my friend. Hope they also love it. Thank you again for sharing such a great recipe.
Awesome to hear. I’m glad you liked it and thank you for sharing glebekitchen with your friends!
Thank you for this recipe. How I pork belly should I make for 6-7 ramen bowl s? 3 lbd feels like a lot. Would 1.5 be suffice?
I like about 2 2 oz slices per bowl so about 4 bowls to the pound cooked weight. You will enjoy a little leftover in any case…
Made this today and very happy with the results. I used 1/4 cup of table salt and like you 1/4 of a cup of sugar for the cure it worked perfectly. Pork cooked in 2 1/2 hrs. Think the 3☆ comment above may have been cooking the pork at 290°c instead of °f. Anyway thanks for the recipe got really positive feedback from all consumers
That is a very interesting observation. I have no idea how you get a big slap of meat to 190F internal temp in 90 minutes at 290F but perhaps it was a units conversion error. I make a fair bit of BBQ and I run my pit at 275-285F. I’ve never seen anything cook anywhere near that fast.
Glad all consumers were happy!
My pork belly is already sliced into about two-inch strips rather than a slab (from Costco). Any recommended change in recipe, other than perhaps cooking time?
Cooking time and go easy on the cure. You have more surface area so you need to be careful not to wind up with something too salty. Full disclosure – I’ve never tried it this way so I’m guessing here.
Just made this! Was amazing, thank you for sharing
Haha. Don’t thank me. Thank David Chang! I’m just the messenger…
Hi there! Just want to thank you for the recipes! I just followed your pork broth recipe and the result was amazing!
Just wondering about this one though, should i blanch the por belly before curing?
CHeers!
Kevin
You are very welcome!
If you want momfuku I’d say follow the recipe exactly as written. This is exactly what they taught me.
Any recommendations for using the skin? I like to try for a no-waste kitchen.
Pork rinds (chicharonnes)?
This pork belly came out perfect! I made a 3pound pork belly and cooked it for 2 1/2 hours in a glass dish. I used Alessi kosher salt (the recommend brand is not available in my area) I used 1/4 cup salt with 1/4 sugar for the cure. I rinsed it before cooking just in case. It came out perfectly seasoned.
It’s addictive stuff for sure. Glad you liked it!
Tried the recipe and loved how it turned out. Minimal effort for an awesome tasting pork belly. Thank you for sharing the recipe.
You are welcome! Glad you liked it.
I had a three pound piece and cooking at 290F it took less than 90 minutes to hit 190F in even the thickest part. This recipe seems off. Questioning if 290F is really correct if the expectation is that a 3lb piece could take 2-4 hours. I expect even cooking at just 190F you’d hit equilibrium in under four hours. 90 minutes doesn’t give the collagen much time to break down, which is what would help make it tender, and that reaction happens as low as 160F and up to 180F.
And despite it not being mentioned either way in the actual recipe, it would definitely recommend brushing off the cure before cooking because what’s left is still excessively salty if you get a bite (and yes I used Diamond Crystal kosher salt).
I don’t know how accurate your oven thermometer is and I don’t know how thick your pork belly is so I don’t know what to tell you. I use an IR gun to measure oven temperature whenever I use it for something like this so I know I am at 290F.
I do know you would be waiting a long, long time if you tried to cook at 190F so I wouldn’t recommend anyone follow that piece of advice.
The recipe states you don’t need to use all the cure. In fact it tells you to not feel obliged to use all the cure. I have updated the recipe to to suggest brushing off the cure or rinsing the pork before cooking as this does seem to be an issue people are running into. I try to be as precise as possible in my recipes but I don’t always think of everything I am afraid…
Can I used smoke Maldon salt, and brown sugar?
Thank you,
Brown sugar should work. Won’t be exactly what they do at the restaurant though. Depending what you are using it for, I would stay away from smoked salt. It really depends on whether the final dish you are making would be better with smoke I guess…
While I appreciate the written recipe, always remember to wash off the salt cure! Leaving it on will result in an extremely salty pork belly.
I’ve been explicit on kosher salt from the beginning. And now updated it to the specific brand despite my strong desire not to specify brands on this blog. Do not use table salt. It is much denser and therefore more salt by weight for any given volume.
I currently have the pork belly drying in the fridge. Do I wash the salt,sugar mixture off before baking? I used kosher salt in place of table walt. I hope that is acceptable.
The recipe calls for kosher salt. Do you mean you used table salt? Brush off the excess if there is any and keep going. A quick rinse likely won’t hurt either.
I have this in the oven now…was lucky enough to score a cheap pork belly. I have to say, I never tried the version in the cookbook because it didn’t seem likely to achieve the texture of the restaurant, so thanks for posting this. (my belly is a bit thin, but hopefully will be ok)
I didn’t have much faith in the cookbook either. You should be OK. Internal temp is really the critical thing.
I followed the recipe to the letter and the meat was so salty it was inedible. What could have gone wrong?
I am very sorry to hear that. This is my go to quick pork belly for ramen so I make it a lot. If you really followed it the letter I have no ideas. If you used kosher salt (not table salt), followed the cure period and discarded the drippings it should have been on the salty side of balanced. I have a pretty high sensitivity to too salty so I’m at a bit of a loss.
Kosher salt varies greatly in volume depending on the size of the flakes.
Table Salt:Mortons:Diamond Crystal
1 to 0.75 to 2 I think
I have avoided naming brands as much as possible but I do use Diamond Crystal exclusively.
Did you use a rack in the pan? Thanks for the recipe
I don’t use a rack for this recipe. Just lay the pork belly in the pan…
Excuse the language translation here. But when you say ‘skin’ you mean just cutting the thin layer of skin off and leaving the fat on the meat?
Yes, that’s exactly what I mean.
Your pork belly might not have skin already when you buy it, mine doesn’t. Pig skin is what footballs and some shoes are made from, you’ll definitely know if the skin/leather is still on.
This pork belly recipe is perfect! I baked it in a glass ovenproof dish with a few tablespoons of water on the bottom, then sealed it with aluminum foil. It took 2 hours for the 1.5 lb piece to cook to 180F. I then turned up the temp to 425F for 5 minutes. Delicious on steamed buns!
I was so happy when they shared their recipe with me. Glad you like it too!
How do I steam it to make it the next day for ramen?
Slice it how you want to serve it and then steam it until it is warmed through.
I’d just throw it in the ramen broth when you add the noodles. Steaming seperately seems redundant.
Except that puts something cool in your nice hot broth. Up to you of course. I personally like my soup as hot as possible.
How long are the leftovers good for?
For as long as any cooked pork is good for. Nothing different here…
Have you tried to freeze any of this in the fortunes for later? Did it work well?
I’ve never tried to freeze it. I always just eat it all up. It’s tasty stuff:-) I think, if you vacuum sealed it, you would be OK though.
Wrap it up tightly in serving sized slices, about 1-1/4 inches thick (3cm) slices. Place a small paper label towards the end of each wrap for easy identification. Wrap in tight layers of cling wrap each slice then put in a freezer ziplock bags. It will keep for months, just take out, thaw and reheat in a toaster oven
Thanks for the tip!
Do I bake/cure it fatty side or meaty side up?
Fatty side up for both. It probably doesn’t make much of a difference for the cure – I just always do it that way…
This looks and sounds very tasty. Do you wipe the cure off the meat before roasting in the oven?
You can if you want. You aren’t really using the drippings so it’s not so critical.
Keep cure on, start at 450° for first hour, baste and rotate every 30 min., crank down to 250° for last hour.
Should work but that’s not Momofuku pork belly…
Amazing results. I used a 5lb slab and used your recommended recipe and it came out so tasty. It took exactly 4 hours to get 190F. The only thing is mine came out like pulled pork after I sliced it. It’s some of the best pulled pork I ever had lol but not quite what I was looking to get for ramen. Needless to say, I still put it in the ramen and the family loved it.
I’ve sorry. I’ve never had that happen to me so I have no idea how to help.