Indian chicken biryani is a magical thing. It’s party food. And there’s a reason. Everybody loves it. It’s just really tasty stuff.
If you have ever made biryani you know what I’m talking about. It’s the moment you crack it open. The aromas reach out of the pot and grab you. You take that first bite. And you know you’ve made something special.
Traditional biryani is a labour of love. It’s real work. Worth it. So worth it. But it takes time. And it’s tricky. So it isn’t easy to get your fix.
The hardest thing is the rice. Biryani calls for rice that’s 70 percent cooked. Then you take raw chicken. Toss it in. Finish cooking the rice and hope the chicken cooks. Not trivial. Doable. But not trivial.
It works. But there’s an easier way. Restaurant style.
Restaurants aren’t making biryani for 100 at once and hoping you’ll come in and ask for it. They make it to order. Like everything else in an Indian restaurant. And this is how.
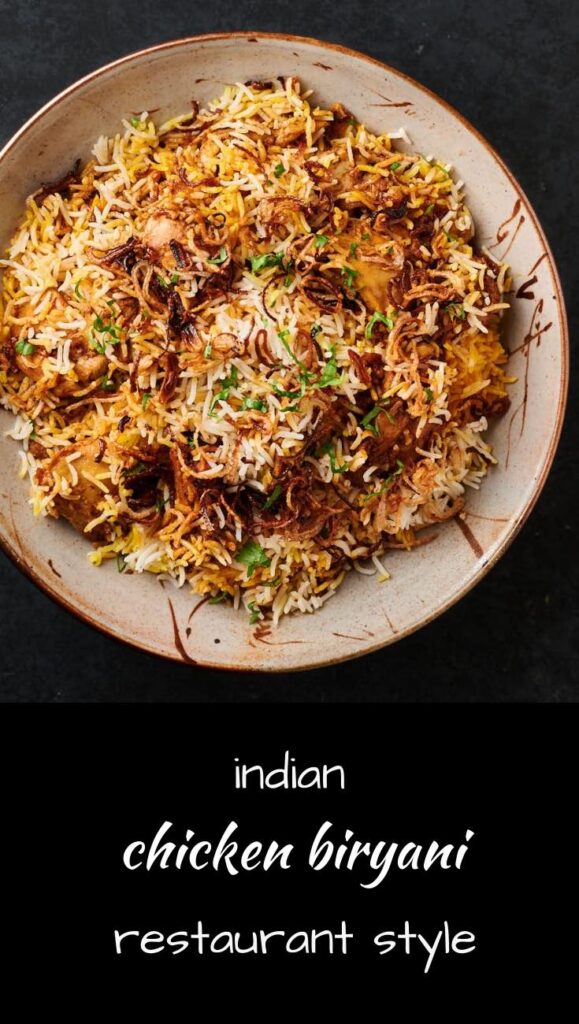
Chicken biryani restaurant style
This isn’t stir fried rice. There are a few recipes out there that tell you to stir fry a bunch of stuff. Toss in some pre-cooked basmati. Mix it up. And call it done. This isn’t one of those.
You could simplify it. You could pre-cook the chicken completely. And then just heat your chicken biryani through. But that wouldn’t get the magic. The infusion of flavours into the rice.
I bet that’s what a lot of restaurants do. Just go as fast as they can. But that’s not how I roll. I want it all. I want the taste. The depth of flavour. And I want it fast. Maybe not quite as fast as in a restaurant. But close.
Flavour the rice
Biryani is about rice. That’s kind of obvious. But it’s about rice that’s infused with flavour. It’s the combination that make the magic.
So plain white basmati isn’t going to cut it. It needs spicing up. That’s not hard. Just a few extra ingredients.
And salt. Please salt your rice. It’s just not going to work if you don’t. This is not the place to watch your sodium.
Nothing to this step really. Just toss the seasoning into the pot. And cook. Easy. But really important. So don’t skip this step.
Chicken biryani gets a boost from chicken stock
I’m going to guess this one is not Indian restaurant standard. It might be somewhere. Probably should be. But I haven’t seen anyone do it. So I’m going to say this one is a glebekitchen special.
The magic in a biryani comes from cooking the chicken in a sealed pot. It’s like pressure cooking chicken flavour into the rice. 15 minutes and half cooked chicken isn’t going to cut it.
So it has to come from somewhere. And that somewhere is chicken stock. Not 100 percent chicken stock though. Just enough to get things going in the right direction.
Cook the chicken
Traditional chicken biryani has seared chicken that hasn’t nearly been cooked through. That works because the rice can stand a nice long cook. That’s why it’s parboiled.
Restaurant style doesn’t take as long. So the chicken has to be almost cooked when it all goes together. Not a big deal. Just an adjustment in the approach.
The time it takes to sear big pieces of bone in chicken isn’t a lot less than the time it takes to cook bite size pieces of chicken thigh. So roughly even from a timing perspective.
And you have the benefit of seriously tasty chicken. So it’s a win-win.
Experienced Indian cooks will notice I leave the yoghurt out of this recipe. That’s not an oversight. I’ve tried this with yoghurt. I wanted to love it. I really did. But it doesn’t work. It blunts the flavour too much. And glebekitchen is all about flavour.
Bake your chicken biryani
This is probably the biggest difference between a classic biryani and the restaurant version. Bake your biryani. Toss it in the oven and close the door.
Classic biryani is cooked on the stove. Or over a fire. Making it for 100 takes a big fire. Super cool videos on YouTube about that. But building a fire is a little too imprecise for a restaurant. Unless you’re an absolute master like Francis Mallmann I guess.
Restaurants need repeatability. Predictability. It needs to work. Every. Single. Time.
And they don’t have a hundred burners on their stovetops. But they do have ovens. And you can stack a lot of single servings of biryani in an oven.
Makes sense to me. I use the oven whenever I need consistent, even heat. And consistent even heat works well here.
Make this recipe your own
I worked hard to come up with this recipe. I ate a lot of biryani. A lot. Luckily I like it so it wasn’t too much of a hardship.
In the end I have a technique. That I can use to mix things up. Lamb. Hyderabadi style. Whatever I want.
And you can do it too. I don’t like raisins in my biryani. If you do, toss some in. Want it spicier? A bit of green chili with the cumin seed will fix you up. Richer? Add some ghee to the pot before you put it in the oven.
Whatever you want. Go for it. Make it your own chicken biryani. But make it. Just make it.
chicken biryani – indian restaurant style
Ingredients
The rice
- 1 1/2 cups basmati rice
- 1 1/4 cups water
- 1 cup chicken stock – low or no sodium. Bouillon cubes are not chicken stock.
- 3 green cardamom pods
- 5 cloves
- 2 inch cinnamon bark also known as cassia
- 1 tsp kosher salt
Biryani spice mix
- 1 tsp garam masala
- 1/2 tsp turmeric
- 2 tsp cumin powder
- 1 tsp coriander powder
- 1/2 tsp kasoor methi also known as dried fenugreek leaves
- 1 tsp kasmiri chili powder
- 1/2 tsp amchoor powder dried mango powder
The chicken
- 5 tbsp neutral oil I use canola
- 1 lb chicken thighs boneless, skinless and cut into three or four pieces per thigh
- 1/2 tsp salt
- 1 cup shallots thinly sliced
- 1/2 tsp cumin seed
- 1 tbsp garlic ginger paste
- the biryani spice mix
- 1 tbsp tomato paste diluted with 4 tbsp water
The chicken biryani
- the seasoned rice from above
- the cooked chicken along with all the tasty sauce
- 1 tbsp fried shallot plus more to garnish (see notes if you want to make them yourself)
- a few strands of saffron diluted in a couple tablespoons of warm water
- cilantro and fried shallots to garnish
Instructions
- Before you get started set your oven on to 350F.
Make the rice
- Want perfect rice every time? Get a rice cooker. I don't like one trick kitchen appliances as a rule but I love my rice cooker. Something to think about…
- If you do have a rice cooker use it. Just combine the rice ingredients and proceed as you normally do. While the rice is cooking cook the chicken.
- If you don't have a rice cooker this is an easy way to make basmati. You can pre-soak, rinse or whatever you want but this works pretty well as written. Blasphemy. I know. But it works. I did this for years until I got a decent rice cooker.
- Pick a saucepan with a fairly tight fitting lid that's not way too big. Combine the water, chicken stock, green cardamom, cloves, cinnamon stick, salt and the rice in your chosen saucepan.
- Bring to a simmer over medium heat uncovered. Reduce heat to low and cover. Simmer for 20 minutes. Set a timer. Seriously. While this is going on make the chicken (see below).
- When the timer goes off after 20 minutes, turn off the heat and let stand an additional 5 minutes. Uncover. Remove the whole spices. They should be just sitting on top. Fluff gently and replace the cover to keep the rice warm.
Make the chicken
- Make the biryani spice mix. Just combine all the ingredients in a small bowl. Dilute the tomato paste. Slice your shallots. Have everything at hand.
- Heat the oil in a saute pan over medium heat. Add the shallots and cook until they start to brown. They will brown some more in the next couple steps.
- Add the cumin seed. Cook for about 30 seconds.
- Add the garlic ginger paste. Stir it into the oil and cook until it stops sputtering. Watch it. Don't let it burn.
- Turn the heat to medium low. Add the spice mix and the 1/2 tsp salt. Stir to thoroughly combine the oil in the pan with the spices. Cook for about 30 seconds. Really watch it. There should be enough oil in the pan. If the spices start to stick turn down the heat and add a bit more oil.
- Add the diluted tomato paste, stir and turn the heat up to medium. Cook about a minute.
- Add the chicken and cook, stirring regularly until the chicken reaches an internal temperature of 150F. You want it mostly cooked. It will finish cooking in the assembled biryani.
Assemble the chicken biryani
- Use a pot that's about 9-10 inches in diameter. Make sure it has a pretty tight fitting lid.
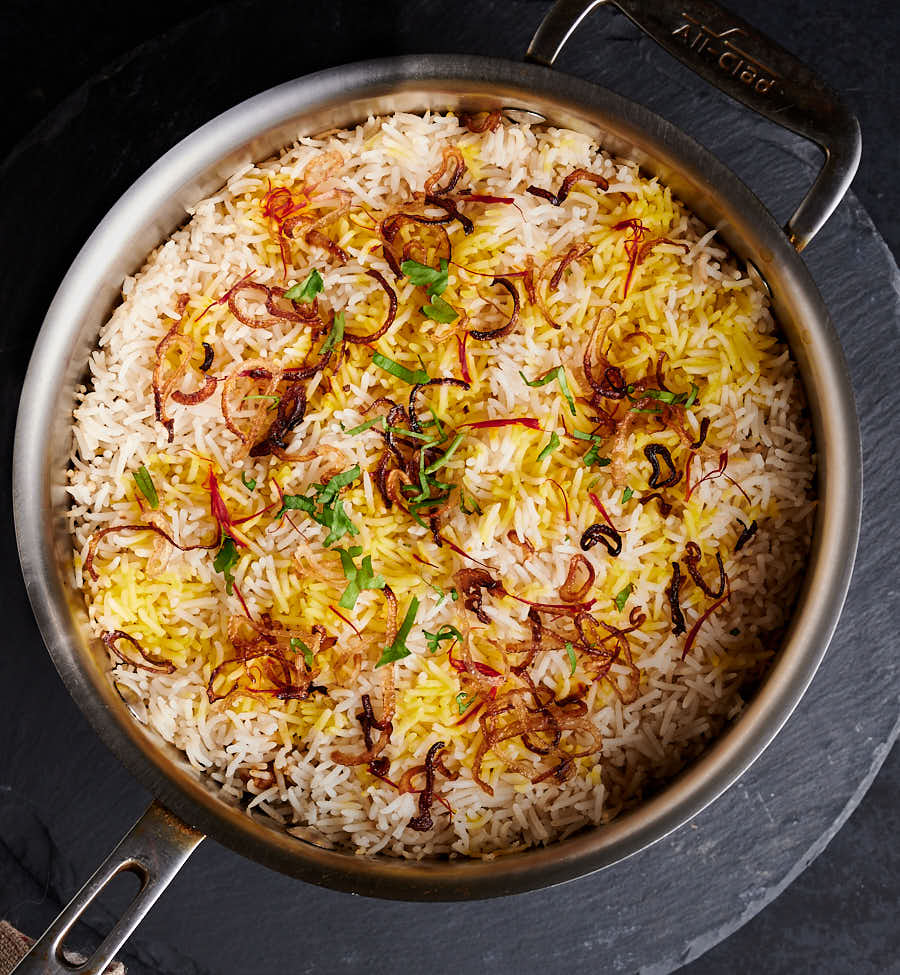
- Put a little more than half the rice in the pot and spread it out in an even layer. Top with the chicken mixture. Add the rest of the rice. Top with the fried shallots/onions (see note if you are making them yourself). Drizzle the saffron water mixture overtop.
- Cover the pot with tinfoil and then the lid. The tinfoil adds a little extra seal. It's not quite as good as the dough seal in a traditional biryani but it will work well enough.
- Transfer the chicken biryani to the oven and bake for 15 minutes.
- After the biryani has baked for 15 minutes remove it from the oven and place it on the stove. Let stand for 10 minutes.
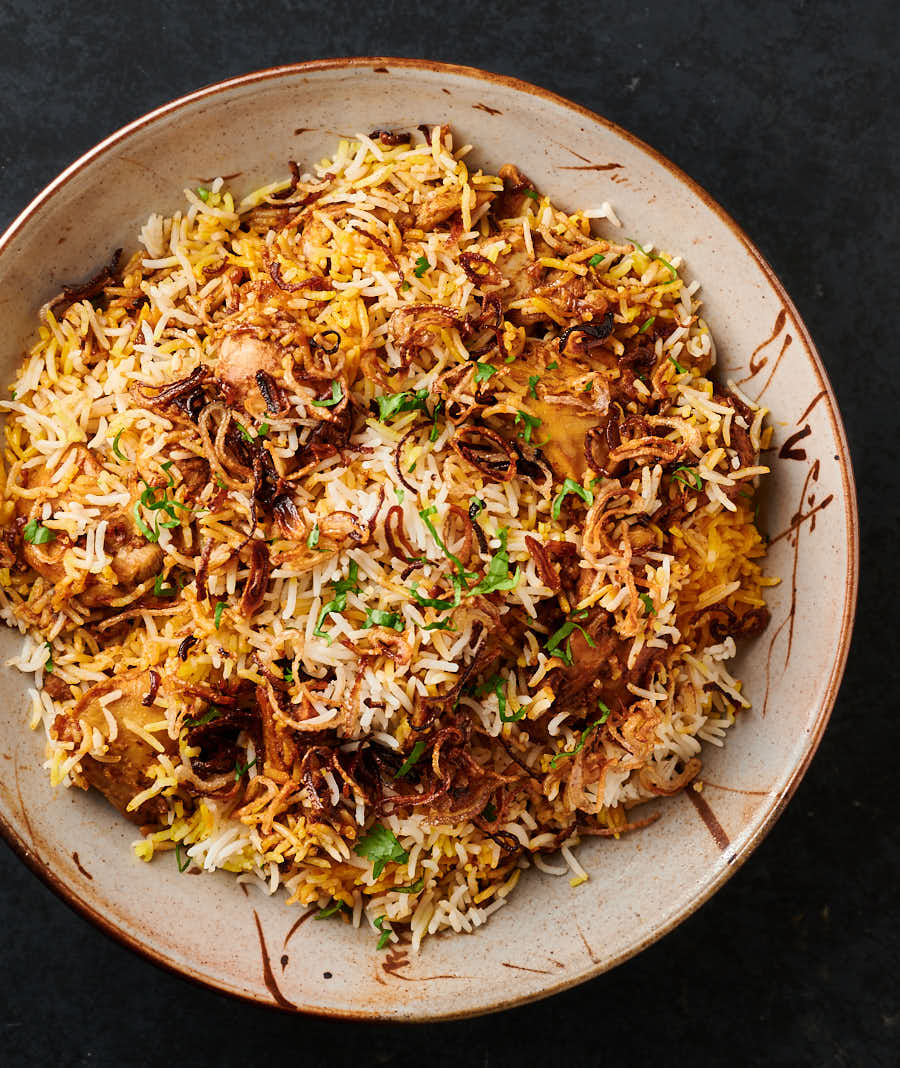
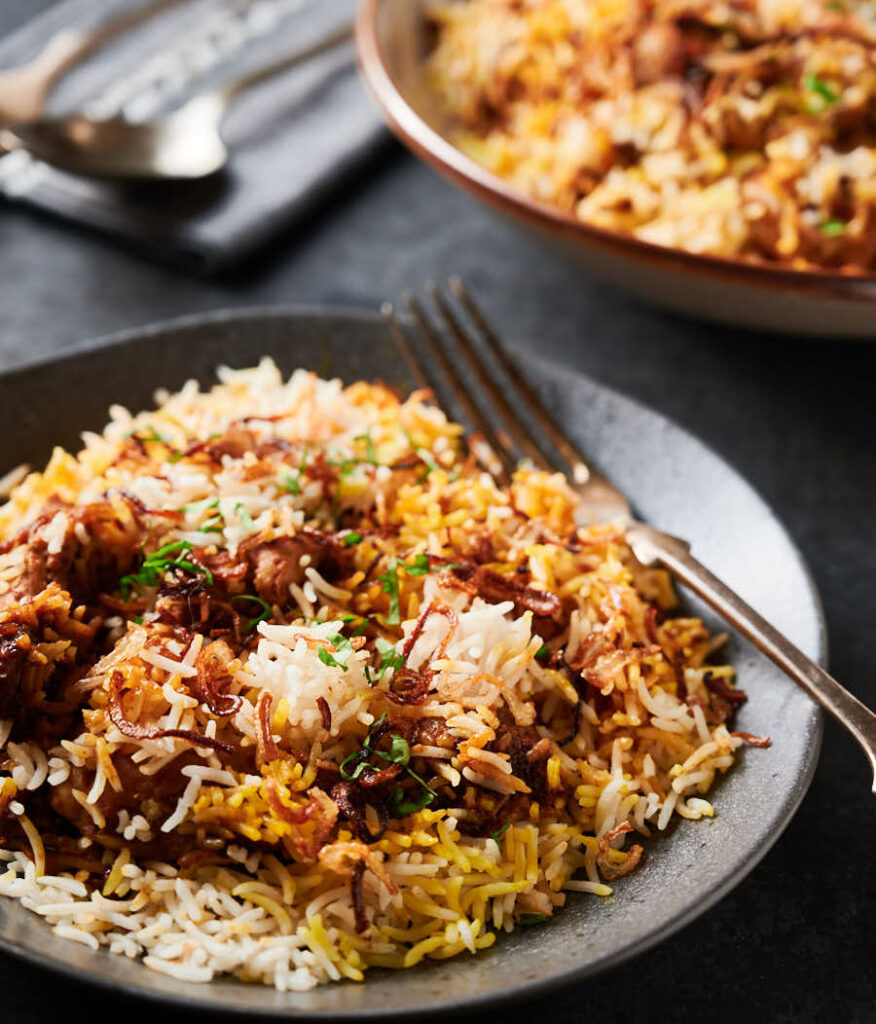
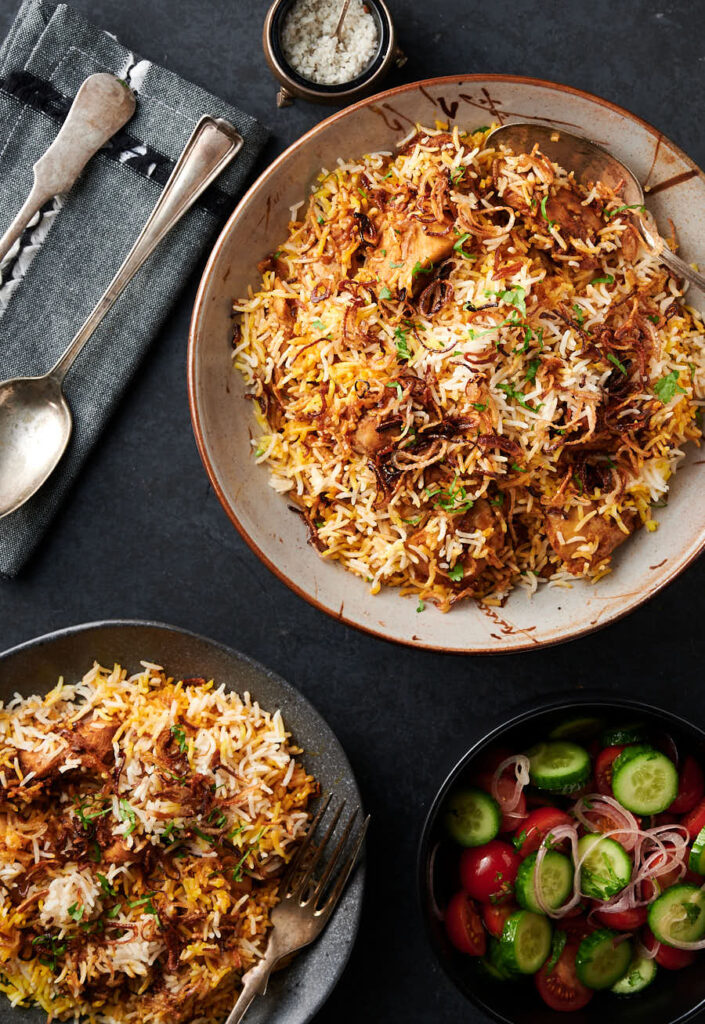
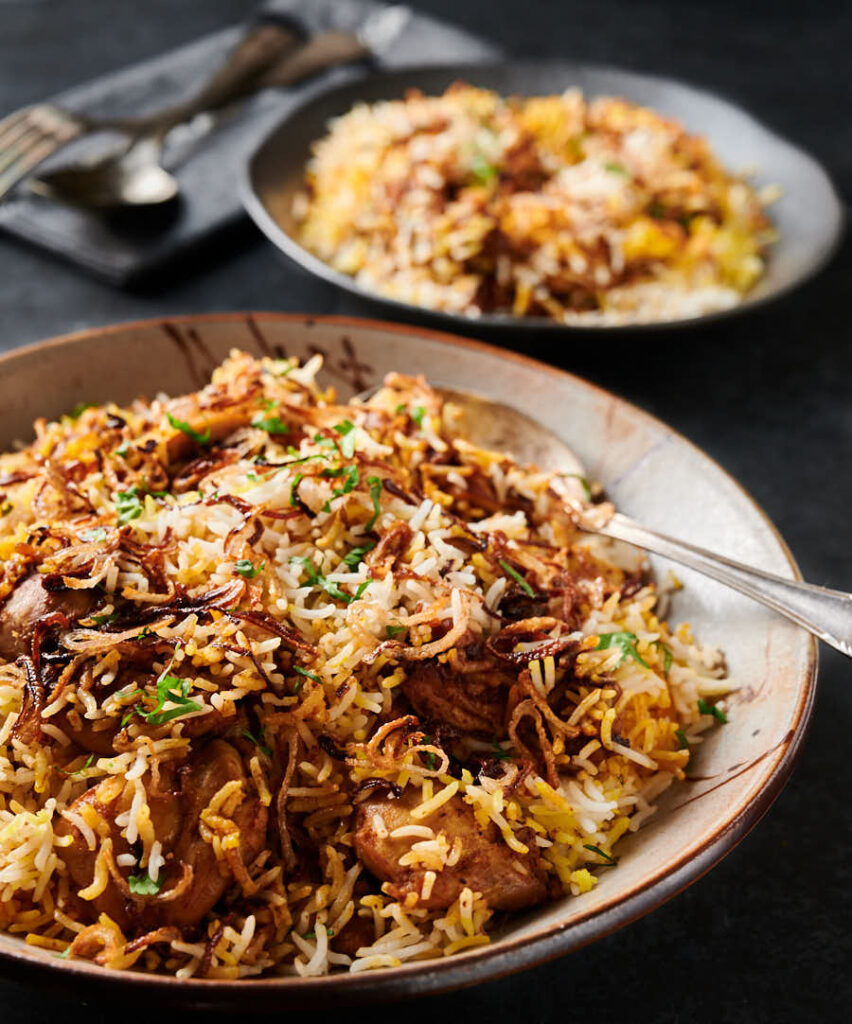
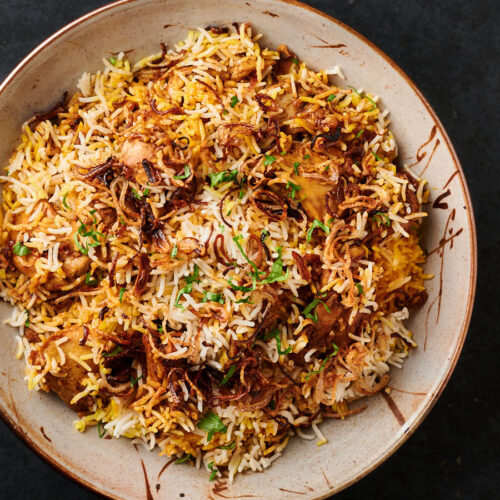
- To serve transfer the contents to a platter. It will get a bit messy. That's OK. The mix will look good, especially once you garnish it. It should look just like the pictures because that's exactly what I did.
- Garnish with more fried shallots and a bit of cilantro. Dig in and enjoy.
Notes
Nutrition
This was a fun and delicious recipe to make! I used my air fryer to make the crispy shallots. Made the rice in my Instant Pot; toasted the spices and rice together with a little coconut oil on the sauté function, then added the stock and salt (I used all stock) and pressure cooked for 4 minutes. Perfect! I didn’t have amchoor so I subbed sumac. I also didn’t have kasoor methi, so I had to leave it out. Will make again when I have some. I used chicken breast, because I prefer it over thighs. And I only used 3T coconut oil for shallots, chicken, etc. and it was plenty. The last change I made was to thinly slice a lemon and place it over the biryani before I baked it for 20 minutes instead of 15 to get the lemon soft. Delicious! I always had lemon served with biryani when I ordered it in New York, so I like the counter-punch it brings when I eat it, peel and all. Thank you so much for this terrific recipe; I will be making it again and again, and exploring your other recipes.
Hope you find lots of recipes here you enjoy as much:-)
Hi Romain, just found your wonderful recipe. Can’t wait to try this. Can you use a tangine for this recipe. Thanks. Cheers
I don’t have a tagine so I don’t know. If it keeps a reasonably tight seal while baking it might. Fun experiment for sure:-). If it works please do let me know.
hey thanks for your blog! would you be able to please make a vegan version of this (would it still work without the chicken?)
I think you could adapt this technique to work with one of the many vegetarian biryani recipes out there. Unfortunately I don’t have one.
Just found this site and already have 3 spice mixes made up and shopping list for curry base done 👍 Quick question, do you have a curry sauce recipe to recommend with chicken biryani, seems to be a given in UK restaurants? Can’t wait to get cooking, tried to replicate a balti for many years and your Karachi recipe is looking promising!
Delighted to hear you are enjoying the site!
I have never had biryani in the UK. I’ve heard some people say it’s a vegetable curry but if it’s creamy/spicy then it’s probably a shorba. I don’t have a recipe (suppose I should do one). There are lots of recipes around so I’d suggest picking the one that suits you the best. That said, while I do like a bit of shorba now and then I really do like this one better straight up.
Love this recipe. This afternoon I served it as part of a Xmas get together buffet for close family and it was devoured in moments. Brilliantly simple, simple wonderful ! Thank you Romain, happy Xmas and best for the new year! X
Happy New Year to you!
Been years since I’ve cooked a biryani. Cooked your recipe last night and so much easier than the last one I cooked. Excellent recipe as always and easy to follow. So tasty, I served it along with a mixed vegetable curry.
Nice! This one isn’t quite authentic dum biryani but it’s easy and I think it’s super tasty!
Absolutely perfect! I have always wanted to try making this dish but it seemed so complicated. However, with your instruction, which is always crystal clear, I attempted this for our meal tonight and I wasnt disappointed. Truly wonderful dish, ty xx
Delighted to hear that! When I ask my wife if she has any requests I almost always get this one or the Rao’s meatballs…
Absolutely brilliant! Made it yesterday and i can tell you, the pot was empty! Only thing i did not have was the mango powder. I used dried peel of the citron powder. So glad i found you and the effort you put in us to teach us how to Cook proper Indian food! 🥰
Delighted to hear you enjoyed it. An empty pot is always a good sign:-)
Please forgive me. The ratio of rice to water is still 1:1.5. Head got confused with fractions 🙄
Glad you figured it out!
Hi Romain, going to make this tonight. My wife’s go to takeaway meal. I’m thinking yours will beat it though.
Saw a rice cooker in the supermarket and couldn’t resist. One question though, the amount of liquid to rice is way more than you usually recommend. 1 1/4 water and a cup of stock? Is this same amount for rice cooker and hob?
This is superb…… we had a lot of family round and I just tripled the mix….. everyone loved it. Thanks
Awesome to hear!
Hi Romain,
I just finished making this wonderful dish for the umteen-dozenth time (a technical term meaning quite a few) and it’s absolutely delicious, as always. I’ve done a version with Naga Tikka chicken which was fantastic, but this time I kept it mellow with your Madras Masala replacing the Garam Masala, reduced the clove and increased the cardamom pods in the rice. It nice of you to encourage experimentation!
I have learned so much from your website. Thanks so much for all the time you’ve put into it!
Delighted to hear you enjoy the website and even happier you are making the recipes your own.
I’ve made it umpteen-dozenth times as well. It is one of my wife’s favourite (like make me this for my birthday favourite:-)
Hey Romain! I have been loving your website, thank you for putting so mich time and effort into it!
How does this recipe scale up? I want to make it for 6 (ish), can i double it and keep the whole spices in the rice the same, or should i double them too?
Also, can I use a larger pot (big le creuset dutch oven for example) or is a smaller pot necessary?
Thank you! Delighted you are enjoying it.
This one will scale pretty linearly. I’ve doubled it and just rolled back a bit on the spicing for the rice (full salt though). You will need to resist the urge to cut back on oil though. This recipe is about the oil coating the rice to bring the flavour everywhere.
I honestly think your blog was sent to us by some benevolent being from outer space. I’ve so many favourites from the site! My question here is, can I use a pressure cooker / instant pot? In which case would I cook the chicken a little, layer uncooked rice > chicken > uncooked rice > shallots then cook with 1:1 liquid to rice, plus a little extra? My cooker says 4 mins low pressure, with natural release for basmati. I wonder if the chicken will be cooked/raw/overcooked?
Greetings from outer space:-).
I don’t think that would work but I’ve never tried. Getting the rice and chicken to come out right at the same time is a bit of a tall order. As it happens I’m having this for dinner tonight myself:-)
Hi! I’m really excited to try this. I was just wondering, because I currently don’t have a working oven, would it produce a similar result if I continued cooking the chicken and rice together on the stove for 15 minutes, covered with tinfoil and a lid?
That is the classic biryani approach. Be careful with your heat so you don’t make a soffrito by accident. Good luck getting your oven back!
Romain, I now use your recipes for all my curry making and have not once been disappointed in the end result. I have never been good with rice though, usually making a gloopy inedible sludge, but the photo of your biryani looked so good I had to give it a go. On Saturday I made this rice dish with a backup Jalfrezi (just in case) I don’t have safron in my spice cupboard so I replaced it with half a tsp each of turmeric and paprika in a couple tbsp of water and as I added it, I thought ” I’ll be putting this in the bin in 30 minutes” but no, what came out of the oven was one of the tastiest dishes I have made and a perfect side dish to your Jalfrezi. An absolute winner. My question to you Romain, is, where is the crossroad and how long have you got?
I am delighted to hear about your breakthrough with rice and hope your days of gloopy inedible sludge are behind you for good.
If I understand your question my crossroads are Bank and Glebe in Ottawa and I’m going to beat him. Never going to get me:-)
Finally made this and it was superb. Followed the recipe exactly. Very easy to make.
Made a vegetable curry to go with it as per UK restaurants.
A new favourite. Going to try it with chicken tikka next time.
Awesome to hear. When you make it with tikka you won’t get the chicken juices so think about a little extra stock. Or just throw a little tandoori masala into the mix to get the flavour (that’s just me thinking out loud…)
Love the Biryani! Great dish!! Only feedback is that in the method above under ‘make the chicken’, there isn’t reference to taking the shallots out of the frying pan (I do now see you notes on frying shallots) – somewhere between steps 2 and 5 I assume? I left mine frying, added the garlic/ginger paste, then the spices as instructed. All came together well, but I didn’t realise the shallots are a topping, not part of the chicken. Could the method be slightly updated to make it clearer for simple people like me? Thanks for all you do Romain.
They are both. The shallots in the chicken mixture go with the chicken. The fried onions/shallots are an additional garnish. I’ve updated the recipe to try to make this as clear as possible.
Hey Romain
Made several other currys from your recipes – all excellent and I’m making this tonight.
Just a query on the rice measurements please.
In the recipe for 4 people it says 1 1/2 cups of rice to 1 1/4 cups of water.
But in the comments above you say to use 1 part rice to 1 1/2 parts liquid.
Unless I’m being daft these ratios are different!
Sorry to be a pedant but would rather ask than guess.
Thanks again for all these brilliant recipes…we are all so impressed!
Delighted you are enjoying the blog. For this recipe the combination of the chicken stock and water maintain the 1 to 1 1/2 ratio of rice to liquid.
As with all your recipes I really enjoyed this. I realised after I made it that you list saffron in the ingredients and I didn’t remember actually ever using it. I did a page search and you never mention saffron again. At what stage was it meant to be added?
I sort of assume you just pour it over the mixture before you put it in the oven? But wasn’t sure.
You are absolutely correct and I have corrected the recipe. Thank you for pointing this out!
Absolutely delicious this is about the 4th recipe of yours I have tried and they have all come out great, in fact they’re getting better each time I cook them. My Asian husband loves them too because they taste authentic. I can’t wait to try out your other recipes each week.
This one is a household favourite so I am delighted you enjoyed it. Thank you:-)
Made this tonight and it was absolutely delicious.
Delighted to hear that. It’s a household favourite here!
I am going to try this tonight do you have the ingredients in grams rather than cups? Thanks
Sorry – I do not. A cup is 237ml. The rice is measured by volume. As long as you are 1 part rice to 1 1/2 parts total liquid the method works.
Per hubby this is the best and closest recipe of the dish he wants to try. Is there a video of this on YouTube or anywhere else? I think I saw your channel and loved the curry base but didn’t see the restaurant version biryani
Delighted to hear that. I don’t have a video for this one yet. It’s definitely on the list though.
Hi
Since we moved to another area the curries are not up to the standard we are used to.
My brother in law told me about your website. I wasn’t holding my breath but boy was I wrong.
So far I have tried your lamb pathia and cooked the lamb how you suggested and have portioned it out ready for use. And tonight your I tried your chicken biryani outstanding. You need to bring out a cook book. I have so many cook books and your curries leaves them all standing. Thank you
Delighted to hear you made the leap. Maybe I’ll do a cookbook someday but for now glebekitchen is just a labour of love. It’s my hobby.
…… and AGAIN! another wow absolutely loved this!
Feedback: I used chicken stock and salt in the rice using a rice cooker. For me this was a little too salty.
For Richard Gilham.
I used the nearly restaurant style chicken madras recipe posted by Romain. Once the sauce was ready I added chunks of sweet potato, simmered for 10 mins, added cauliflower florets, simmered for another 10 mins and then finally added sliced courgette and simmered for a a further 5 minutes. This made a perfect vegetable curry to go with the Biryani rice.
Thanks again Romain.
Great to hear you enjoyed it. I have recently discovered people are using bouillon cubes in place of stock or stock that is high in sodium. I’ve been updating recipes as I discover them to warn against this. Perhaps this is why you found it salty?
Romain
Yes, I used a cube. Mea culpa.
Hi Romain. We normally have a sauce with our biriyani at our local restaurant, what is the best recipe to use for this?
Thanks
I’m afraid I don’t know. I don’t do the typically UK takeaway biryani with the veg curry (I assume that’s what you mean) so I don’t have a recipe to recommend.
i think the reviewer might be talking about is raita… i may have mispelled it. its yogurt with shredded cucumber and carrot or tomato depends on the restaurant . im hoping you might have a recipe for naan to go with the bryani?
If it’s raita I do have a recipe https://glebekitchen.com/easy-mint-raita-indian-mint-sauce/
The sauce you are taking about is called mirch ka salan which is a must with Hyderabadi Biriyani
Romain,
If I was allowed just one word to sum up this recipe it would be ‘BRILLIANT’. If, however, I was permitted two to express myself then they would be ‘STUNNINGLY BRILLIANT’.
We have used your recipes multiple times. All have been very well received. I have never commented before. There are plenty who do that. But I felt it would simply be wrong not to say something about this chicken biryani.
You are a star! Many thanks.
Thank you for taking the time to comment. It’s appreciated and I am especially glad you enjoyed the biryani.
HeY Romain, I am taking my son and his groomsmen away to Fernie BC on his stag do in March. I would really like to make them one of your curry dishes as I’ve tried a few and had great success with them.. Thanks for that. But I cannot cook restaurant style for ten lads much too much hassle. What curry would you suggest I would be best cooking in a Dutch oven which I can leave to fester whilst I get on with little side dishes etc!! Thanks in advance..
Steve
Congratulations. Bunch of drunk lads? Nihari gosht – https://glebekitchen.com/nihari-gosht-indian-beef-stew/ – without a doubt. That’s breakfast in India – perfect for hangovers! It is amazing on mashed potatoes as well. Crazy sounding but true.
Wow…Nuff said
Glad you liked it. I ate so much rice figuring this out.
And I had a look at your photography. Wow… Nuff said.
Love your recipes. Very rarely get takeaway now as wife and kids say mine just as nice!!
Done this using chicken marinaded in a tandoori masala spice mix and then quickly sealed before adding to the onions. Truly was as good as anything I’ve had from a take away.
We cook one of your curries every week. Favorites being the bengali chicken, shahi korma and chicken jalfrezi. Thank you thank you thank you.
You are very welcome! Delighted to hear that. Thank you.
Love your tandoori masala idea. Will try that myself!
This is made and when cooked will sit in the fridge until tonight’s tea – I cannot wait for this day to be over – it smells divine !! Thank you for changing our curry world !
Hope it turns out to be worth the wait!
Wonderful as usual *****
That you for saying! Glad you liked it.
Please i need 2 chicken baryani and 2 bottles water 1.5L
That will be 30 minutes…
I added a bit of fresh chopped mint and coriander to the chicken and half a chopped tomato and some green chillies. It was delicious. I usually use yoghurt but followed your recipe and forfeited it and it was good. Going to try this next time with shrimp.
Nice. I love it when people take the recipes here and make them their own!
Just buy a cup measure! No one seems to know what I’m talking about as it’s almost unheard of in the UK but there’s plenty of CUP measures in the market!
Romain, any ideas if I can use a pressure cooker for the rice?
Haha. Thanks for the chuckle. I looked on amazon UK and there are indeed many, many brands of measuring cups.
I have never done rice in a pressure cooker. I just looked at a few recipes and it seems to me, so long as the rice is cooked properly, that it should be fine. The pressure might even increase the infusion of flavour of the rice. So long as your rice smells of the spices when it’s done I expect it to make no difference (other than saving you some time).
I regularly use my pressure cooker for rice, with great success.
Hi,
Any chance you could metricise the recipe for European fans of your otherwise excellent website?
I’m glad you like the website. I am in Canada and I use what is standard here. I have 300 recipes on this site so it’s a little late to adapt I am afraid.
I appreciate your perspective though. I cook using both standards depending where the recipe is coming from. I personally don’t find it that hard. 1 cup = 237ml or roughly 4 cups to the litre. 454g to the pound, 28g to the ounce – 2.2 lbs to the kilo. Unless I am baking I find slight errors don’t large affect the outcome.
I thought only USA, Liberia and Burma still used imperial measurements. Maybe metric is just for official In Canada use though, and everyday folk stick with the old units.
But it’s your choice as to who you want to target with your website. We still appreciate your recipes and superb photography.
Re: briyani
Good morning one chicken biryani spicy mix packets for it now.
Your faithfully
MDewan
Maral Dewan
This is going to be a regular in our house.
Due to no meat here, replaced the chicken with fish and paired it up with a king prawn & mushroom balti and naan. Most excellent.
Sounds fantastic!
OK, thanks for that. One final question: What is the definition of “a cup” (water / rice quantities).
An 8 oz fluid measuring cup.
Cooking the rice for 20 minutes seems a little excessive – won’t it turn to mush if you cook it that long? Are you looking for perfectly cooked rice at this stage or slightly al dante (bearing in mind there is more cooking to come?
Cheers,
Bert
The rice goes into the oven perfectly cooked. The recipe works as written. No pre-soaking. No rinsing. No rice cooker.
Is the amchoor powder important, else is there an alternative? I haven’t got that one.
Everything adds a little something in the layering of flavours. Amchoor has a little bit of sour tang. I would leave it out rather than try to replace it with something else. Not the end of the world if you can’t find it…
Which brand of basmati rice did you use?
Thank you
I think I used Elephant brand for this but the real key for me is a good rice cooker. I cannot believe how completely foolproof a good Japanese rice cooker can be. I resisted for years and years but I now love my rice cooker!
Will (precooked) lamb work with this? I’m never very excited about chicken in my Indian food.
It might. I’ve haven’t tried yet so I don’t know. You are capturing the flavour extracted from cooking the chicken in the “gravy” here so it isn’t pre-cooked chicken in the usual Indian restaurant style recipe. Without trying it I don’t know if the flavour lost from pre-cooked lamb would lessen the flavour. I’ve gone for as big a chicken flavour as possible here.
You could try poaching the lamb in lightly salted water until just done, then reduce the resulting stock down and add that to the part of the recipe where the chicken is cooked?
Looking forward to giving this a go at the weekend, been hankering after a biryani recipe from you for ages lol! If using brown basmati how would that affect the cooking time?
It’s not for lack of trying. This one was really hard and I couldn’t get any restaurants to give up their technique for some reason. The last “secret” perhaps? Hope it lives up to your expectations.
I’ve never made brown basmati in my life so I have absolutely no idea. I’d cook it as you usually do but add the same seasonings suggested in the recipe and see how that works. If it’s tasty go ahead and make the biryani. If it’s not, white basmati is only 25 minutes away!
Well Romain you’ve done it again! Stunning recipe, fabulous flavours and the brown basmati worked fine, just added a little extra cooking time and came out perfectly.
This is amazing. Second time making it and blown away by the flavours. As you say, pre prep is key. Had a friend round who said it was better than any restaurant Biryani he had had. Thanks for sharing.
Steve ????
Great to hear!
This is the closest yet I have tried multiple recipes for chicken Briyani that are nothing like it this is very very close perhaps you should add to it the vegetable curry that most restaurants give you to put on the top but anyway thanks for a great recipe
Glad you liked it. I’m personally not keen on covering up the flavour of the biryani with that vegetable curry so I’ve left it out but I do take your point.
This the second time I have cooked it this time time with more confidence and quicker I don’t know how you do it but spot on
Good to hear you are dialing it in! I don’t know how I do it either. It just happens. Although for this one it took a lot of tries before it just happened:-)
Andy
Brown rice will have a more durable outside, which will make the cooking time change just a little. I would experiment with cooking time to get the correct tenderness you want. Other than that, I agree with Romain that all the same spices in her recipe should be used.